In this post we have discussed about concepts of SAP Roles and Profiles. As we discussed earlier, roles are like containers which contain authorization objects, tcodes etc. Roles are created via PFCG tcode and when roles are generated, we get authorization profiles.
These roles are added to users via SU01 tcode or PFCG tcode. When they get added with a proper validity period, the authorization profiles get assigned to users. These authorization profiles provide the necessary authorization.
Below screenshot shows user to role assignment options via SU01 and PFCG tcodes respectively:

Let us create a role using PFCG:
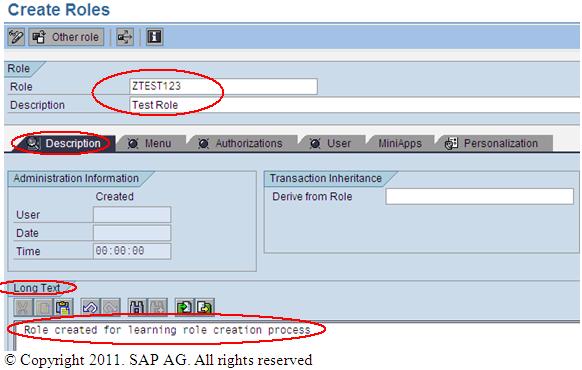
Let us name the role as ZTEST123 (As a good practice, we should always use names which begin with Y or Z while creating any role). Click on “Single Role” button to create a single role (We will discuss about various role types later). Let the role description be “Test role”.
In the next screen, we see various tabs: Description, Menu, Authorization, User etc.
In the Description Tab, on the right side there is a text box labelled as “Derive from Role”. This text box comes into picture when the role being created is a derived role of some master role. We will discuss about this in details when we go through various role types.
At the bottom of the description tab, there is a “Long Text” field. This field is not a mandatory field, but we should use this to maintain information related to role creation tickets and role updation reasons etc. This will be helpful for audit purpose.

The next tab is “Menu” Tab.
In this tab, we get the option to assign tcodes to roles. Apart from tcodes, we can also add reports, queries, URLs etc.
Let us add tcodes-su56, su01, va03, su56 to the role.
To do this, click on “Transaction” button in the Menu Tab and add the tcodes in the “Assign Transactions” dialog window.

Next we come to the next tab-“Authorizations”. It is from this tab that gives the option to maintain authorizations and generate profile.
In the “Authorizations” tab screen, we find options to maintain “Profile Name” and “Maintain Authorization Data and Maintain Profiles”. See below figure:

In the label “Profile Name” we can give our own profile name (as I have given ztest123) or we can leave it blank. In case we leave it blank, the system will automatically create a profile name with naming convention “T-<First and Last character of SID>xxxxxx“
Next we need to maintain authorization data and generate profile. For this we can either click on either “Change Authorization Data” or “Expert Mode for Profile Generation”.
Note: Expert Mode is mandatory when a SU24 change is made. We will discuss about Expert mode in details when we discuss SU24 later.
After we get in the next screen-to maintain authorization data, click on Utilities->Technical names on

This option helps us to see the technical names of authorization objects and authorization classes.

In the above screen we maintain authorization for roles. After the authorizations are maintained, we generate the profile using “Generate” button at the top or by pressing “Shift+F5”.